My Little Bug

My Little Bug

Saturday, July 5, 2014

Thank you for joining us on 

My Cricut Craft Room's Cricut Lovers Come Here Blog Hop

If you are just joining us please start at My Cricut Craft Room


 Today I made a vinyl project vinyl project to share with you. 
The owl is from create a critter and the tree is from wall decor and more. The font is Nursery rhymes.

I added beads and googly eyes.
Cricut looks dapper in his pink bow tie.


Next in line is
 Karen Haywood- http://countrygirl-karen.blogspot.com.au/


LINE UP AND SIGN UP
2. Rebecca Benson- http://queenmommiedom.blogspot.com 
3. Rosa Kleyman- http://kleymanr.blogspot.com/ 
6.  Robin (Maggin) Jones - http://www.custom-comforts.blogspot.com 

Monday, May 26, 2014

Cupcake Ovens

Here's a tutorial on making my cupcake oven I designed on Cricut Design Space.
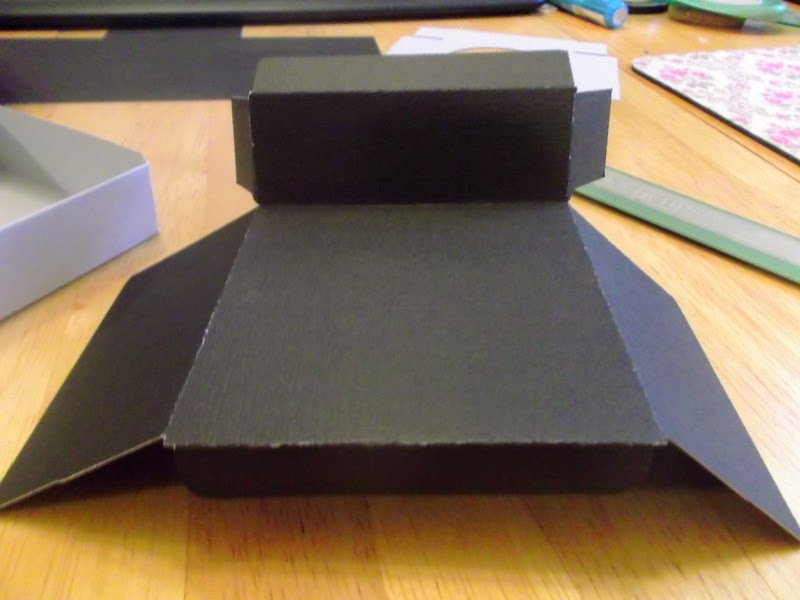
 Fold on all score lines and adhere tabs on drawer insert.
 This is how to fold the stove top.


 fold down and adhere flap on stove bottom.
 folded stove bottom make sure skinny flap is on top otherwise drawer will catch on it
 adhere back flaps to back of main body
 fold and adhere the flaps on top of the stove top.Where the dials go.
 adhere stove top to main body leaving front flap free
 adhere oven window to oven door I used acetate her or you can use vellum for a frosted look (like the other two boxes). I glued a tiny magnet to middle top of door it helps with keeping it closed but is optional. I buy my magnets along with the beads I used on the dials at http://www.miriamscraftingblog.com/ she has great prices and fast inexpensive shipping.
 While waiting for glue to dry i put together the small embellishments

 on the underside of the flap I glued another magnet It needs to be on inside of flap because the magnets are small but strong and without the paper barrier they would rip away from the glue.Make sure the magnets are opposite or they will repel lol.
 put glue on bottom flaps
 stack stove body on bottom and adhere

 Run tape on all edges of wrap
 and adhere to stove

 put drawer insert into bottom leaving it partly out for your fingers add glue to front
 line drawer front up to front of stove and level on table and adhere
 if you used a white core card stock like I did you can clean up edges with a marker or ink pad.

Monday, May 27, 2013

Patriotic Carts


                  This card was made using Create a Critter 2.
        Wishing everyone a happy Memorial Day. Freedom isn't free.


 The statue of liberty teddy is so cute I cut him at 3.5 in. I cut and stacked the fireworks randomly.


 I wanted to embellish the inside and this torch was just the right touch.


Friday, April 19, 2013

Festive Spring


I  used C.T.M.H. Artiste for today's project. I like handing out candy to coworkers.


The butterflies were cut at 4.5 in's as were the flowers. I cut between the petals on the flower and overlapped them so there would be depth.

Friday, February 22, 2013

oil painting

An old painting

Bird Cage

These are some cards I made for Operation Write Home

Cream

These are some cards I made for Operation Write Home

Glamour

These are some cards I made for Operation Write Home

Critters

These are some cards I made for Operation Write Home

Winged Things

These are some cards I made for Operation Write Home

zig zag

These are some cards I made for Operation Write Home

Warm my Heart

These are some cards I made for Operation Write Home

Bananas

These are some cards I made for Operation Write Home

Spring time

These are some cards I made for Operation Write Home

Any Hero

These are some cards I made for Operation Write Home

Thursday, February 14, 2013

I miss giving valentines in school so I made treats for my coworkers.

I used my Cricut with CTMH Artiste cart.
Cut 3 flower shapes at 4ins. Slice between 2 petals and overlap a few petals, glue into place, on next flower overlap about a third of the way, on last flower overlap about halfway. thread flowers on lollipop. glue edges of 2 vase shapes. Insert stick and tie ribbon.

Tuesday, January 29, 2013

Paper Easter Egg

This is my take on the traditional Ukranian Easter egg, I love the bright colors against the black. 

 I used Cricuts Easter 2010 cart for the egg and doily. The flowers and butterflies are from Artiste the pink flowers were 6 petaled, I cut between two petals and overlapped them to give flower depth. I just bent the petals of yellow flower. Vines are from Cindy Loo. With help from C.C.R. I used the Cricut gel pens to draw the butterfly layer and then cut out the base. In C.C.R. do layer one as base, then add layer and line up overlay with base, put in gel pen and "cut", then without removing mat cut layer one.
 The display is a two by nine inch strip formed into a tube, glued to doily and decorated.
 The egg was made by Cricut drawing (see above) overlay on five inch base. Fold eggs in half then run through Xyron. I started to emboss egg then decided it deserved glitter lol. Remve from backing and line egg halves up and press together. Glue on butterflies place on display base and enjoy.
.